You should set it up as a custom OAuth2 credential, then you won’t need to update anything manually. That is more secure anyway.
This is pretty tricky with Zoho but once you know the steps it’s not too bad. Thankfully I have a lot of experience with Zoho so I can help you out. It’s really annoying the first time you do it
I’ll go step by step for you.
These steps will work for any Zoho service for anyone in the future reading this, you’ll just need to change the URI link from the docs
Go to the api docs
For you it will be here.
We need a few things from the docs:
- The redirect URI
- The scopes
- Authorization URL
- Access Token URL
In your case that info is:
The redirect URI:
http://www.zoho.com/invoice
Scopes:
ZohoInvoice.invoices.CREATE,ZohoInvoice.invoices.READ,ZohoInvoice.invoices.UPDATE,ZohoInvoice.invoices.DELETE
Authorization URL (should be the same for all Zoho services):
https://accounts.zoho.com/oauth/v2/auth
Access Token URL (should be the same for all Zoho services):
https://accounts.zoho.com/oauth/v2/token
Save that information for a future step
Go to n8n credential settings
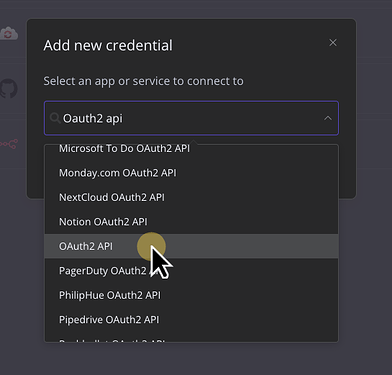
Create a new OAuth2 API credential.
Unfortunately searching doensn’t narrow it down much, you’ll need to find it in the list.
Then press create. Save that page in a separate tab, we’ll need the OAuth Redirect URL in that page for the next step.
Go here to create new zoho “client”
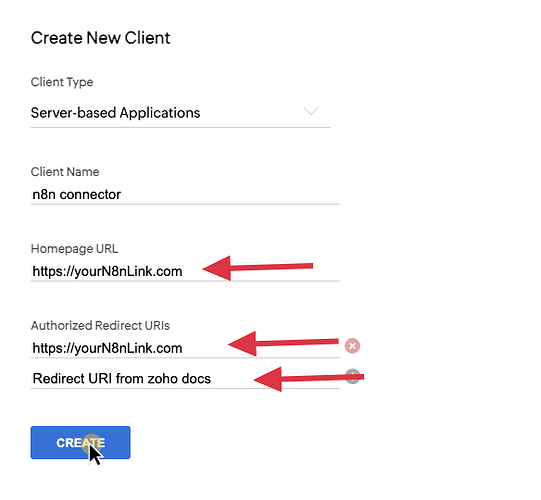
Go to this link and press “create client” in the top right
Then select “server based client”, though multiple will work, this is just the easiest.
Fill out the form like this. The link in the redirect section should be the redirect link from the n8n credential settings.
Once you press create it will display your client and secret id. Copy and paste those into your n8n credential page.
Back to n8n credential settings
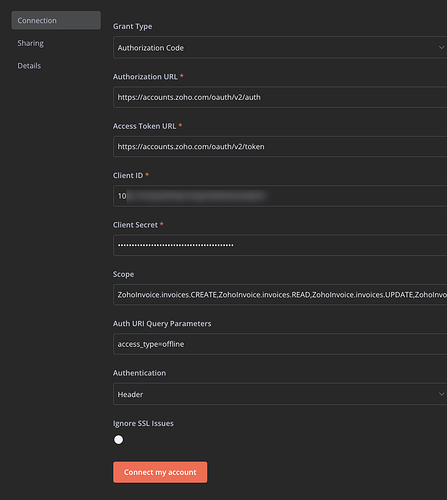
Now you should have all of the info needed for your credential page’s settings.
Only other thing you need to do is add access_type=offline to the Auth URI Query Parameter. That was also found in the Zoho docs.
Your credential form should look like this
NOTE: Best practice is to only use the required scopes for security reasons. Although most people just add all of the scopes for convince.
All done
Just press “Connect my account” button and give access and you’re all set up. You won’t ever have to touch those credentials again.
Let me know if you have any issues


