
Part 2 of the n8n Workflow Testing Series — if you have not read Article 1 yet, it covers how to create a staging copy of your workflow. This article assumes you have a staging copy to test on.
Screenshot note: Some images are “n8n-inspired” mockups, not exact screen captures of your n8n environment—but they should still help you know what to look for. Hint, hint, n8n Design Team… nobody said automation dashboards cannot have a little main-character energy.
The Trigger Problem
Here is something that slows down almost every new n8n builder at some point.
You build a workflow that starts with a webhook. To test it, you have to go to another tool, fill out a form, submit it, come back to n8n, and check if anything happened. Then you realize you want to change one small thing in a node. So you go back to the other tool, fill out the form again, submit it again, and check again.
Then again. And again.
Or maybe your workflow starts when a new row appears in a spreadsheet. Or when an email arrives. Or when a customer makes a purchase. You cannot just snap your fingers and make those things happen on demand. You have to wait — or fake it — every single time you want to run a test.
This is where pinned data comes in. It is one of the most practical tools n8n gives you for testing, and a lot of beginners either do not know it exists or do not use it to its full potential.

What Pinned Data Actually Is
Every node in n8n takes in some data, does something with it, and passes the result to the next node. When you run a node manually in the editor, you can see that output in the panel on the right side of the screen.
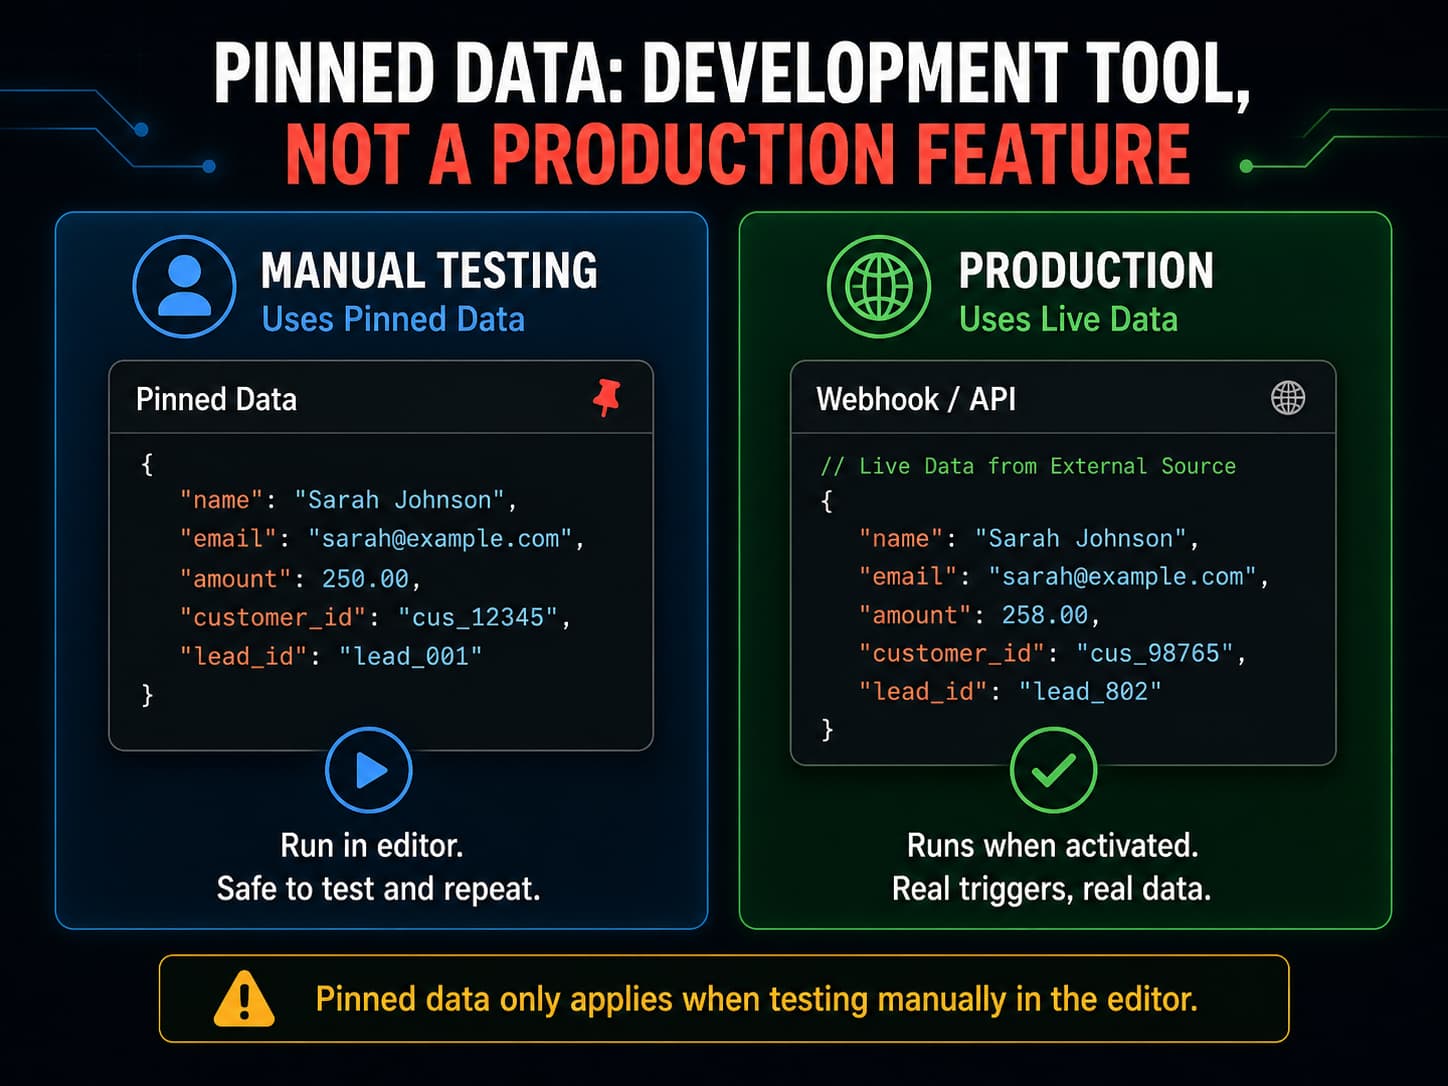
Pinned data means you save that output so n8n uses it again the next time you run the workflow from the editor — instead of calling the real trigger or the real API again.
Think of it like pressing pause on a specific moment in your workflow. You capture the data exactly as it looked at that moment, and then you can replay that same moment as many times as you want without needing the original trigger to fire again.
It is important to understand what pinned data is not. It is not how your live production workflow runs. When your workflow is activated and running on its own in production, it uses real data from real triggers and real API calls. Pinned data only applies during manual testing in the editor. It is a development tool, not a production feature.
With that said, it is an extremely useful development tool.
Why Pinned Data Makes Testing So Much Easier
Without pinned data, testing a webhook-triggered workflow means triggering the webhook every single time. That might mean submitting a form, making a purchase, or sending an API request from somewhere else — over and over, just to see how your workflow handles slightly different inputs.
With pinned data, you run the trigger once, pin the output, and then you are free to test as many times as you want using that same captured data. You can also edit the pinned data to simulate different situations — a missing field here, a weird value there — without ever leaving n8n.
This saves a lot of time. It also lets you test things that are hard to trigger in real life, like a duplicate record, an empty list, or a malformed payload. You just edit the pinned data to look like those situations and run the workflow.
How to Pin Data in n8n
Running a Node and Capturing the Output
Start by opening your workflow in the n8n editor. Run the trigger node manually — click on it and hit Execute Node, or use the Test Workflow button to run the full workflow once.
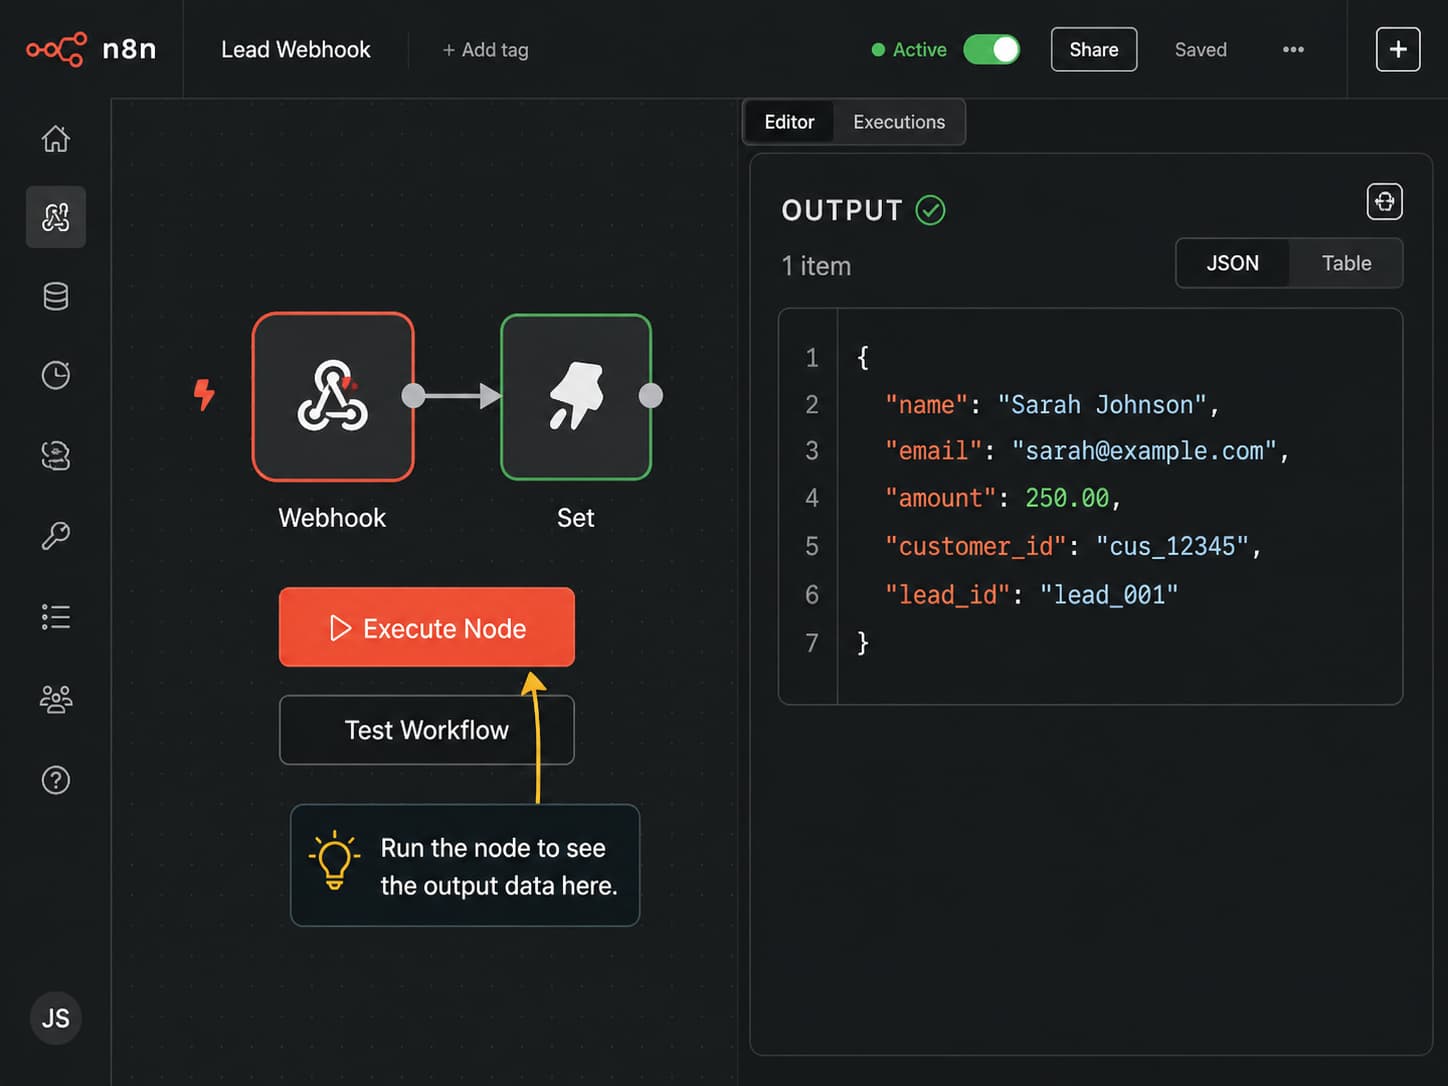
When the node runs, n8n shows you the output in the panel on the right. You will see the fields and values that came through — things like a customer name, an email address, an order amount, and so on.
Now look for the Pin button in that output panel. In most versions of n8n it appears as a small pin or thumbtack icon, but the exact look may vary depending on which version you are running. Click it.
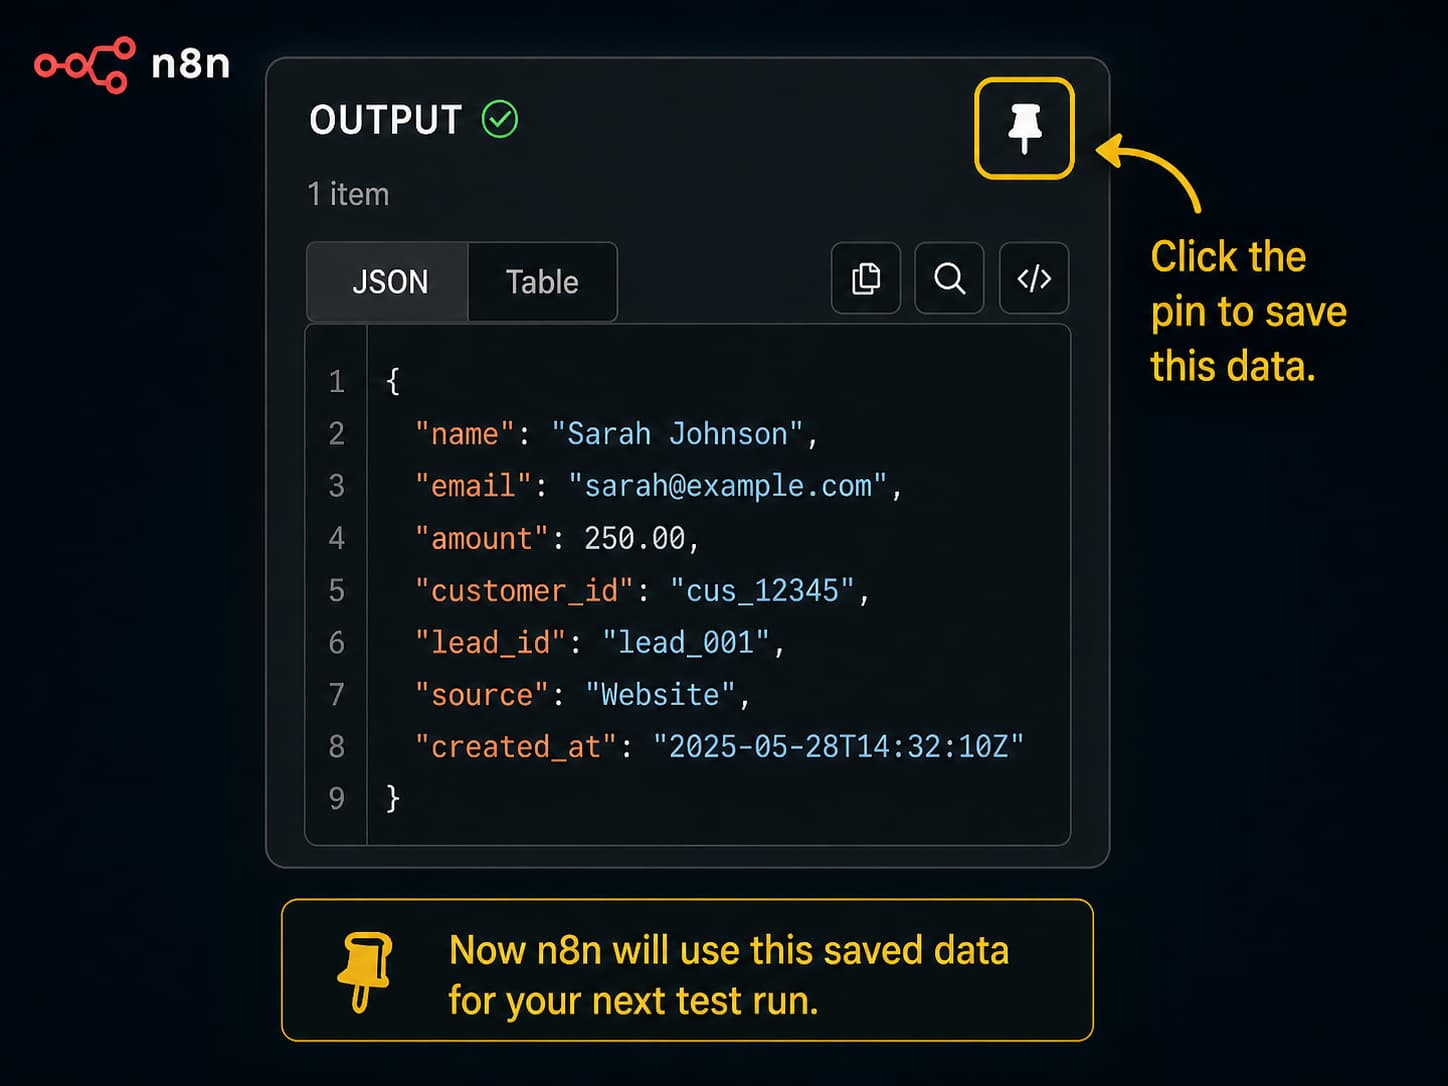
The data is now pinned. The next time you run the workflow from the editor, n8n will use this saved output instead of calling the real trigger again.
Note before publishing: The pin button location and icon have changed slightly across n8n versions. If the icon is not where you expect it, check your version’s documentation or look for a context menu when hovering over the output panel.
Editing the Pinned Data
Once data is pinned, editing it is where testing actually begins.
Click on the pinned data to open it in an editable view. You will see the raw JSON — the structured list of fields and values that your workflow received.
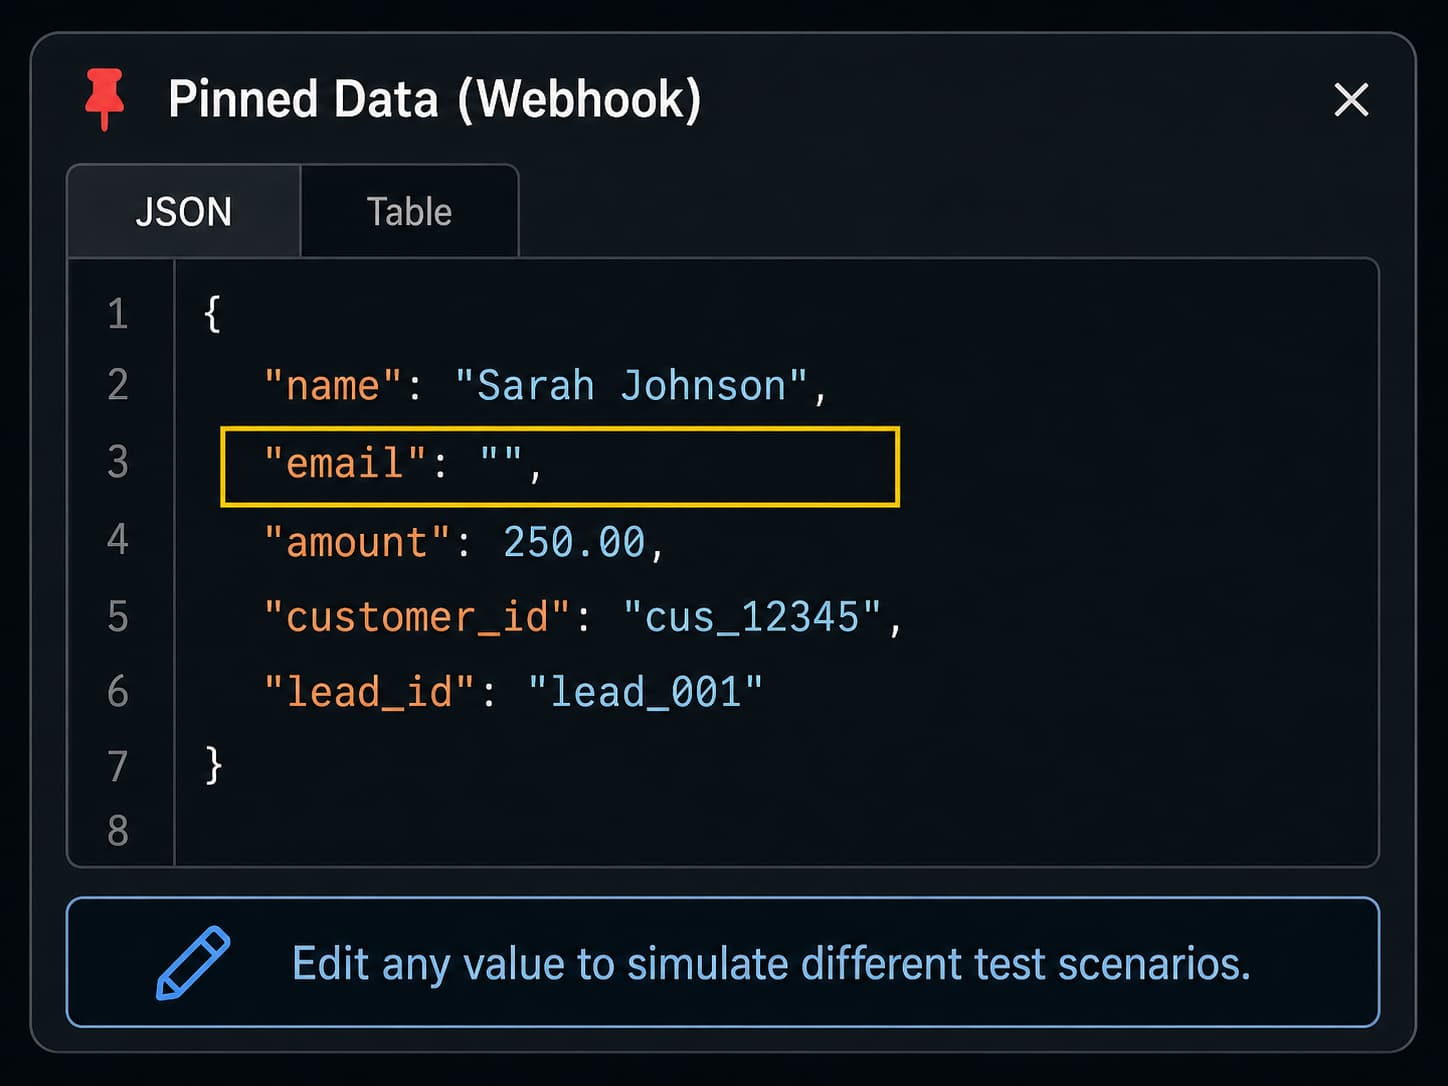
You can change any value in that JSON. You can delete fields. You can add fields that should not be there. You can set values to blank or null. Every change you make becomes the new input for your next test run.
This is how you create test cases without going back to the original trigger every time.
Creating Test Cases with Pinned Data
The most valuable thing you can do with pinned data is use it to test inputs that are broken, incomplete, or unusual — the kinds of inputs your workflow will eventually receive in the real world, even if you did not plan for them.
Start with one good, clean example of real data — the kind of payload your workflow is supposed to handle perfectly. Pin that. Then make copies or variations of it to test different situations.
Here are some examples of bad inputs worth testing, along with what to change in the pinned data:
Missing email address. Delete the email field entirely, or set it to an empty string. Does your workflow catch this? Does it stop gracefully, or does it try to send an email to nobody?
Blank customer name. Set the name field to "" (empty). What does your welcome email look like when it says “Hello, !”?
Invalid amount. Change a numeric field like amount to a word like "free" or "N/A". If your workflow does math with that field, what happens?
Empty array. If your workflow expects a list of items — like a list of products in an order — set that field to [] (an empty list). Does the workflow crash, or does it handle zero items cleanly?
Duplicate ID. Set the customer ID to one that already exists in your database. Does your workflow create a duplicate record, or does it check first?
Unexpected field name. Add a field that should not be there, like "custumer_email" instead of "customer_email". Does your workflow fail silently because it is looking at the wrong field name?
Missing file or attachment. If your workflow expects an attached file, remove it from the payload. What happens when the file is not there?
Each of these takes about thirty seconds to set up in the pinned data editor. But each one could reveal a real problem in your workflow before it ever reaches a real customer.
A Real Example: Testing a New Lead Webhook
Let’s say you have a workflow that fires when a new lead fills out a contact form on your website. The webhook receives a payload that looks like this:
{
  "name": "Sarah Johnson",
  "email": "[email protected]",
  "company": "Acme Corp",
  "source": "website",
  "lead_id": "LD-1042"
}
You run the webhook once to capture this payload, then you pin it. Now you have a starting point.
Test 1: The happy path. Run the workflow with this clean data. Everything should work. The lead gets added to your CRM, a confirmation email goes out, and the lead is tagged correctly. This is your baseline.
Test 2: Missing email. Edit the pinned data and delete the email field. Run the workflow again. Does it fail at the email node? Does it throw an error you can actually read and act on? Or does it crash somewhere deeper without a clear message?
Test 3: Duplicate lead ID. Change lead_id to "LD-1001" — an ID that already exists in your system. Run it again. Does your CRM create a second record for the same lead? It should not. If it does, you need a deduplication step.
Test 4: Blank name. Set name to "". Run the workflow and check what the confirmation email looks like. If it says “Hi there, !” you know you need a fallback for when the name field is empty.
Test 5: Unexpected source value. Change source to something your workflow does not expect, like "podcast" instead of one of your usual options. If your workflow uses a Switch node to route leads by source, what happens when none of the options match?
You ran five meaningful tests and never had to submit a real lead form once. That is the value of pinned data.
When Pinned Data Can Mislead You
Pinned data is a great tool, but it has limits. There are a few situations where it can give you a false sense of confidence.
When the real API response changes. If you pinned data from an API call six months ago and the API has since added new fields or removed old ones, your pinned data no longer reflects reality. Your workflow might pass every test against the pinned data and still fail in production because the real response looks different now.
When your webhook starts sending different fields. If the form or system that triggers your webhook gets updated — new fields added, old fields renamed — your pinned data is out of date. The workflow will test fine locally but behave differently when real data comes in.
When the pinned data is too perfect. It is easy to pin a clean, ideal payload and only test against that. Real-world data is messier. Names have apostrophes in them. Email addresses have typos. Amounts come through as strings instead of numbers. Pinned data only catches the problems you thought to simulate.

The lesson here is not to stop using pinned data — it is to remember that pinned data is a starting point, not a finish line. After you test with pinned data, you should also run your workflow with fresh, real data before you call it production-ready.
Common Mistakes Beginners Make
Assuming that passing pinned data tests means production will work. It means the workflow handles the data you gave it. Production will send different data, sometimes in ways you did not expect. Pinned data testing is necessary but not sufficient.
Forgetting to test with real data before going live. After you have run through your pinned data test cases, trigger the real workflow at least once with actual live data — a real form submission, a real API call — and watch what happens. This is the final check before you turn it on for real.
Only testing the happy path. Most people pin one clean, successful example and call it done. The whole point of editing pinned data is to test the unhappy paths too. Missing fields, bad values, empty lists — these are the tests that actually protect your workflow.
Editing pinned data without writing down what you changed. You change the email to blank, run the test, see an error, and fix it. Two days later you cannot remember which test cases you ran or what you were trying to catch. Write it down. A simple note is enough.
Document Your Results
Testing without writing anything down is just guessing with extra steps. When something breaks two weeks from now — and something will — you will want a record of what you already tested, what the payload looked like, and what you changed to fix it.
Keep it short. This template covers everything that matters:
PINNED DATA TEST LOG

Workflow name: [Your Workflow Name]
Node tested: [e.g. Webhook - New Lead]
Test date: [Date]
Tester: [Your name]

Sample payload used:
[Paste the base JSON payload here]

Test cases run:

Test 1: [Describe the input — e.g. "Normal lead with all fields"]
Result: [What happened — e.g. "Passed. Lead added to CRM correctly."]

Test 2: [Describe the input — e.g. "Missing email field"]
Result: [What happened — e.g. "Failed. Workflow crashed at email node. Fixed with IF check."]

Test 3: [Describe the input — e.g. "Duplicate lead ID"]
Result: [What happened — e.g. "Created duplicate record. Added dedup step."]

Test 4: [Describe the input]
Result: [What happened]

Pinned data still accurate as of: [Date]
Next step: Test with real live data before activating.
Keep this alongside your staging test log from Article 1. Together they give you a solid record of what your workflow has been through before it goes live.

Use AI to Help
One of the best uses of AI in workflow testing is generating bad test data. Instead of sitting there trying to think of every way a payload could go wrong, you can show an AI your real payload and ask it to break it in interesting ways.
Here is a prompt you can paste into Claude, ChatGPT, or another AI tool:
Here is a sample JSON payload that my n8n webhook receives
when a new lead signs up:

[Paste your JSON payload here]

Please generate 8 to 10 variations of this payload that I can
use to test edge cases and error handling in my workflow.

Include variations like:
- Missing required fields
- Empty or blank values
- Incorrect data types (a number where a string is expected, etc.)
- Duplicate or already-existing IDs
- Unexpected or misspelled field names
- Fields with unusual characters or formatting
- An entirely empty payload

For each variation, briefly explain what problem it is
designed to test.
Paste your actual JSON payload into the prompt where it says to. The AI will give you a set of test cases ready to copy directly into the pinned data editor in n8n.
 Zero to Hero Tip: Ask AI to Play the Role of a Bad Data Sender
Most people ask AI to help them think of test cases. Here is a more hands-on approach: ask the AI to actually play the role of a system that is sending broken data to your workflow, and have a back-and-forth conversation about it.
Start with this prompt:
I want you to act as a system that sends webhook payloads
to my n8n workflow. Here is what a normal, correct payload
looks like:

[Paste your sample JSON payload here]

Your job is to send me ten broken or unusual versions of
this payload, one at a time. After each one, I will tell
you what my workflow did with it. Then send me the next one.

Start with something mildly wrong, and get progressively
more broken or unexpected with each payload.
This turns the AI into an interactive testing partner. Instead of getting a list of test ideas, you get actual broken payloads you can copy directly into the pinned data editor in n8n — and you can report back what happened, which helps the AI make the next test even more targeted.
It is a faster and more engaging way to work through edge cases, especially if you find writing test cases from scratch a bit dry.
Production Readiness Checklist
Before you move from pinned data testing to activating your workflow, work through this list:
- I pinned a real output from an actual trigger or API call
- I tested the normal happy path and it passed
- I tested at least five edge cases using edited pinned data
- I tested a missing required field
- I tested an empty or blank value
- I tested a duplicate or already-existing record
- I tested an unexpected or malformed input
- I documented each test case and what happened
- I confirmed my pinned data still reflects what the real trigger sends
- I ran the workflow at least once with real live data before activating
Production Readiness Question: Have I tested what happens when the data is wrong — not just when it is right?
If you have only tested the perfect payload, you are not done yet.
Final Takeaway
Pinned data is one of those features that seems simple at first but becomes more valuable the more you use it. It removes the friction from testing. Instead of fighting with external tools and real triggers every time you want to check something, you just run the workflow against data you already have.
But the real power is not in replaying the same clean payload over and over. It is in editing that payload to simulate the messy, broken, and unexpected inputs that real workflows have to deal with every day.
Test the happy path. Then test everything else. That is what separates a workflow that works once from a workflow that works every time.
Next in the series: Article 3 — How to Build Simple Test Cases for an n8n Workflow