Huh, that’s odd. A proper docker compose release used to be available for ARM CPUs (that’s the architecture I am using), so I am wondering if the availability has changed or if my memory was just playing really bad tricks on me. The respective line in the tutorial is straight from their official documentation. Anyway, I am glad to hear you got it installed and will make sure to update the tutorial when I have a bit of time and have replaced the installation line so for now it uses the Ubuntu-provided docker-compose package instead. Thanks so much for your feedback on this!
Upgrading is not covered by the tutorial but is relatively simple on docker assuming your n8n data is stored on a volume that survives container recreation. In the tutorial this is covered by the - /home/ubuntu/n8n/n8n_data:/home/node/.n8n entry in the volumes section of the docker compose file. This line means that everything your n8n docker container writes to its own /home/node/.n8n directory is persisted in the /home/ubuntu/n8n/n8n_data directory of your Oracle VM.
So with your data safe and sound, you can simply delete the container and create a new one with the latest n8n version by running the below commands:
docker pull n8nio/n8n:latest
docker-compose up --force-recreate --detach
If you want to free some space afterwards by removing older images, you can also run docker image prune --force.
I tried that too. And the docker compose file gets installed in /usr/bin instead of /usr/local/bin, and when we issue tye docker compose up command, it again says file not found.
You could just use compose version 2.x which has arm64 support as well
Quickest way to get it working would be to add /usr/bin to your users path although I would have expected it to be there already in some form so you could create an alias in your bashrc file or maybe just use a symlink.
If it was me and I was using ARM I would just use version 2 of compose and problem solved.
Either location (/usr/local/bin and /usr/bin) is part of the default path value, so you wouldn’t need to worry about that. The command would be different though, compose v1 uses docker-compose, v2 uses the docker CLI (docker compose command).
So this got me thinking, we have configured reverse proxy and have configured port 80 to show port 5678 application (n8n).
I was thinking, how to configure reverse proxy for another application and have it display a web page, now that it is occupying port 80?
specifically, I wanna install ubuntu novnc docker container, and wanna use port 6080. I do not want to break any functionality of n8n, and instead will be absolutely fine with typing 'machineip:6080; in the address bar and use my web browser instead of a VNC client.
Oh, so, by reverse proxy, we are asking nginx to serve the port 5678 on port 80 to outside world, so instead of typing machineIP:5678, we just type the domain name and we get 5678’s content on port 80, right…?
So for this ubuntu novnc application, I don’t need to configure reverse proxy? I leave it as it is?
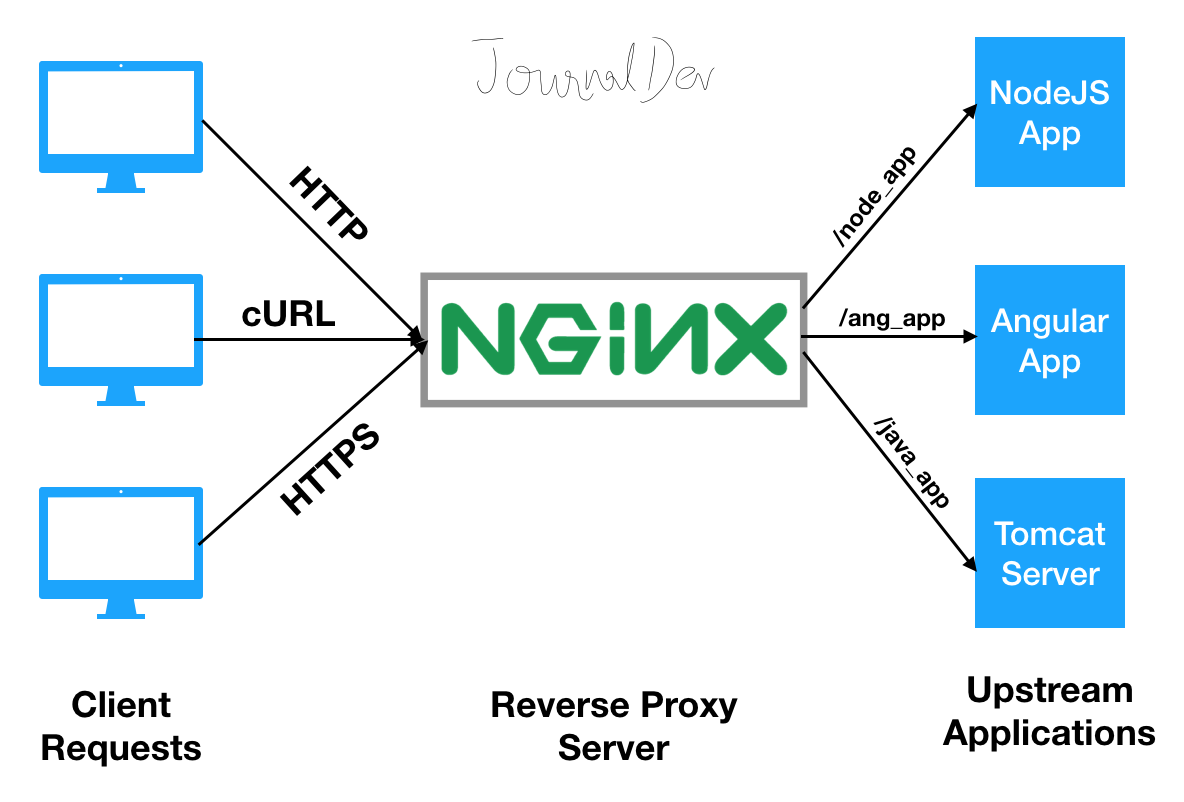
I am not familiar with the novnc application you are using, but in the tutorial you can see an example server block setting up a reverse proxy in the Configure NGINX section:
This proxies all traffic coming in on port 80 (the value after the listen directive) for my <domain name> to port 5678 internally (proxy_pass http://localhost:5678;) without having to open port 5678 to the entire world. <domain name> is of course a real subdomain like n8n.mutedjam.com on my actual server. I could also add some additional authentication here or anything else supported by nginx really.
You can have multiple of these server blocks, each using a different subdomain (so something like n8n.mutedjam.com and novnc.mutedjam.com) but both listening on port 80. They’d only need to be routed to their correct port internally.
If you want to make it even easier I have recently discovered NGINX Proxy Manager which I have just started using so I don’t need to manually update my nginx config files anymore.
As an added bonus it also handles the Lets Encrypt process.
Hi @MutedJam thanks for your very thorough tutorial how to set this up! I somehow found out about both n8n and the oracle’s free tier at the same time and thought I will google out if somebody has tried to make them work together. Then I found this, Happyhappyjoyjoy.
I’ve never done this type of stuff but thought I will give it a shot as I’m really into learning automation and super interested about the possibilities with n8n. I want to try connect to it by using Flowmattic in Wordpress.
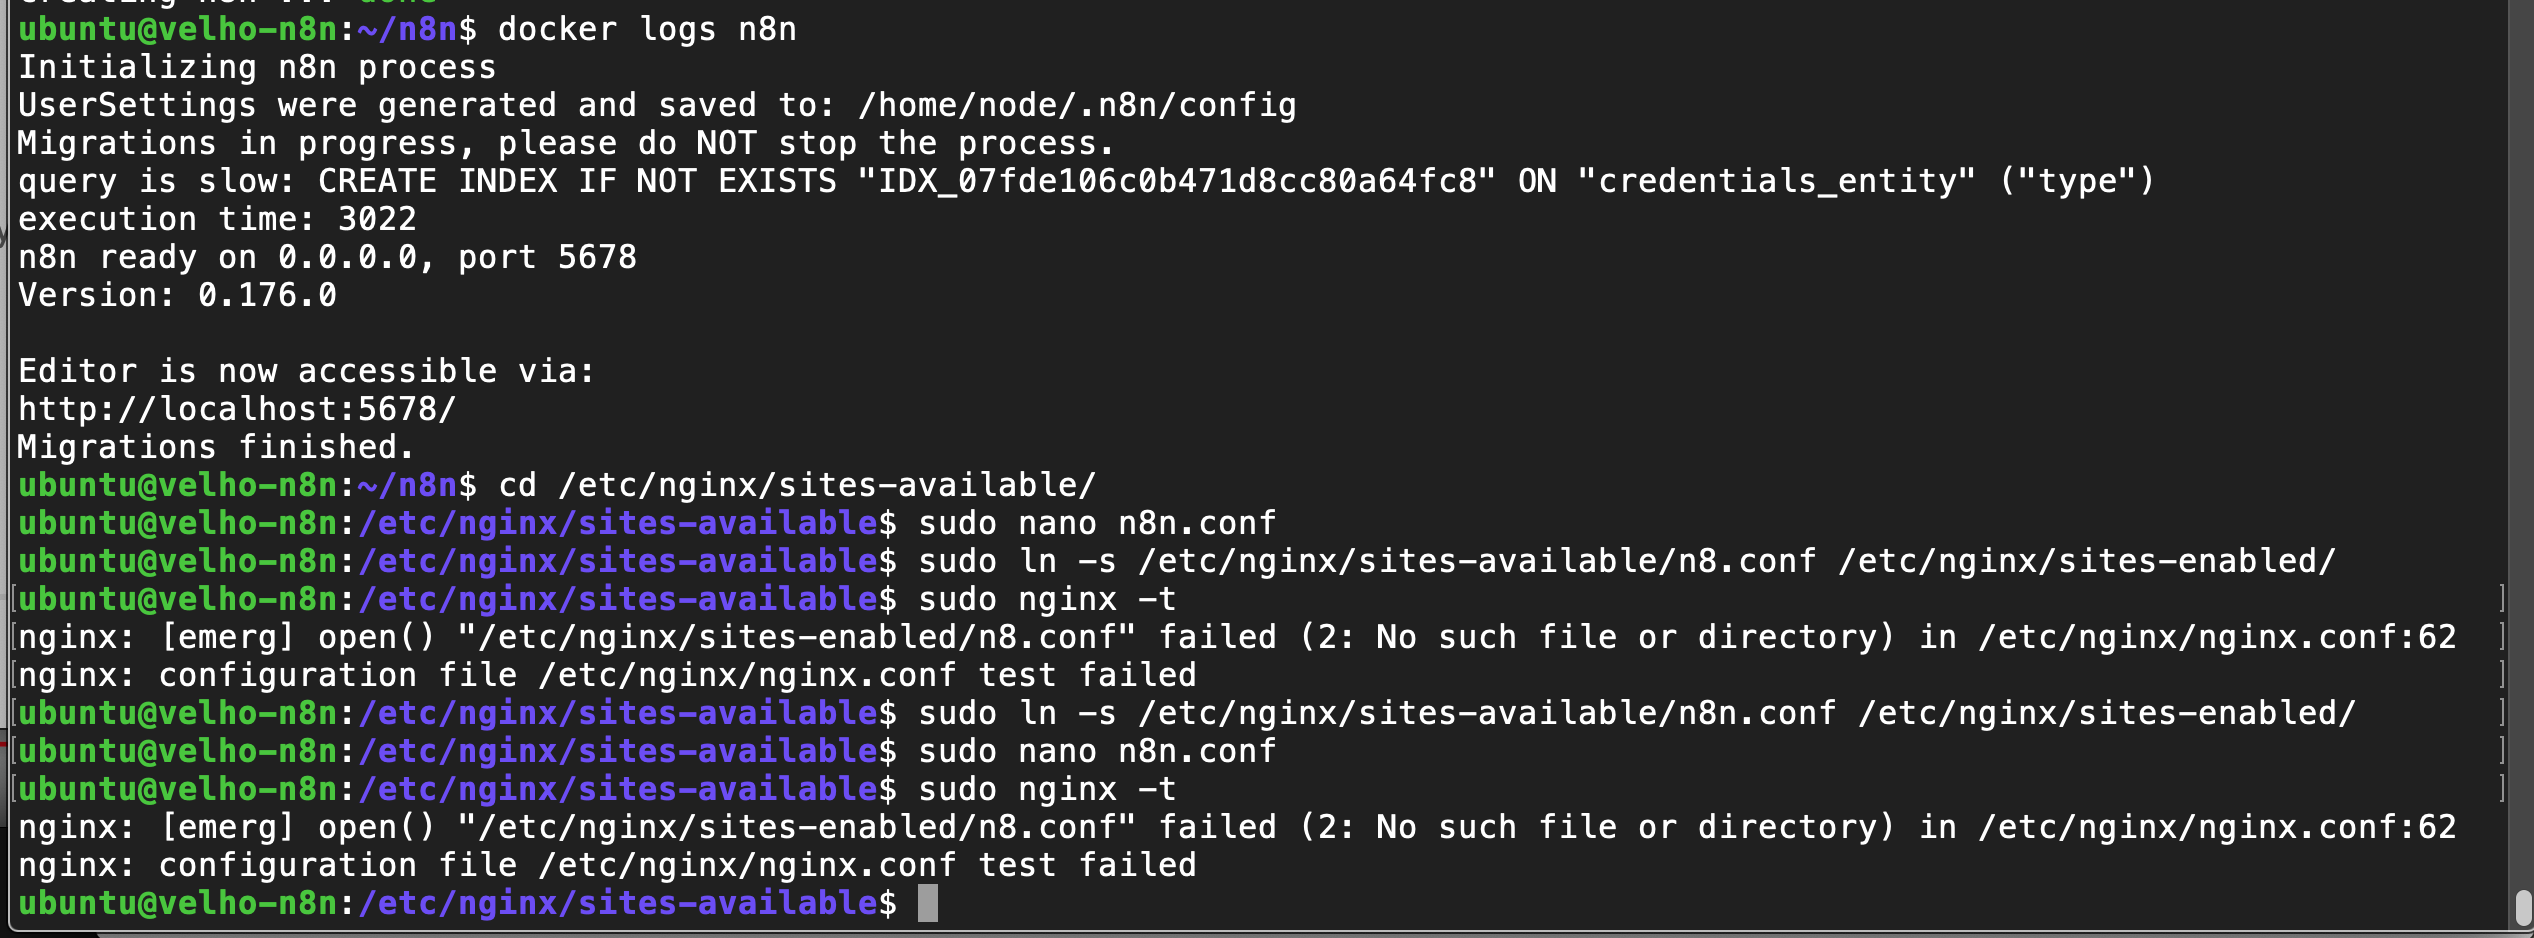
Your tutorial helped me all the way to the end but then I got stuck on the last metres. I was following your tutorial’s “Configure NGINX” -part when this happened Could you take a look at the screenshot I have attached and tell me what I have possibly done wrong?
I think this could be a left over symlink in the /etc/nginx/sites-enabled/ directory. If you look at the error message it says /etc/nginx/sites-enabled/n8.conf failed, meaning nginx is looking for a file called n8.conf (but can’t open it).
What does the command ls -lh /etc/nginx/sites-enabled/ give you? Does it by any chance list a broken link behind n8.conf? If so, try running sudo rm /etc/nginx/sites-enabled/n8.conf, that should remove it
Thanks for the sudo rm, now that I removed both files n8.conf and n8n.conf, i managed to copy the file again and now the sudo nginx -t returns successful
It’s quite a bit of work to get this running (especially if you’re new to this), but once you have everything up and running you should have a solid foundation not only for n8n but for other web apps too.
Yeah there’s so much to it. But thanks to your tutorial it was a really a breeze.
Unfortunately obtaining the Let’s Encrypt certificate failed for me and I’m stuck again.
It has something to do with that I could not create the subdomain directly in NameCheap because the domain is fully directed to a hosting that runs with cPanel. So I made a subdomain in cPanel and added a redirect for it but it seems that’s not the correct way to do it. Maybe I should do it with cPanel’s zone editor instead by modifying the A record? Because that’s what the Let’s Encrypt seems to catch at the moment…
Unfortunately I don’t know how cPanel would handle the redirect, but it seems very likely this is related. You could technically skip the SSL/TLS part but I wouldn’t recommend doing so (seeing you will typically send sensible data like API tokens or passwords to your n8n instance you’d want that encrypted).
How are your current A records configured? If you have a wildcard record like *.example.com pointing to your existing hosting solution, you could still add a separate record for n8n.example.com pointing to your Oracle Cloud Instance.
Learned something about the inners of cPanel here as well. It was exactly like I thought, and you said as well. The trick was to go to the cPanels Zone Editor and replace the IPs pointing to the hosting’s IP with the servers IP. After this I ran again the CertBot and it returned successful. After flushing local DNS cache the connection is secure.
However I still see only the “Welcome to nginx!” screen. I tried “sudo systemctl reload nginx” but it doesn’t seem to help. Any suggestions?