This is a quick tutorial on how you can use the rarely mentioned Langchain Code Node to support upserts for your favourite vectorstore.
Disclaimer: I’m still trying to wrap my head around this node so this might not be the best/recommend way for achieve this. Feedback is very welcome. Use at your own peril!
Background
At time of writing, n8n’s Vectorstore nodes do not support upserts because you can’t define IDs to go with your embeddings. This means you’ll get duplicate vector documents if you try to run the same content through a second time. Not an issue if you are able to clear the vectorstore when you insert… but what if you just can’t and only want to update a few specific documents at a time? If this is you, then using the Langchain Code Node is one way to achieve this.
Prerequisites
- Self-hosted n8n. The Langchain Code Node is only available on the self-hosted version.
- Ability to set
NODE_FUNCTION_ALLOW_EXTERNALenvironmental variable. For this tutorial, you kinda need this to access the Pinecone client library. I suspect the same to be true for other vectorstore services.- For this tutorial, you’ll need to set the following:
NODE_FUNCTION_ALLOW_EXTERNAL=@pinecone-database/pinecone
- For this tutorial, you’ll need to set the following:
- A Vectorstore that supports upserts. I think all the major ones supported by Langchain do but no harm in mentioning it here.
- You’re not afraid of a little code. I’ve attached the template below so you can copy/paste the code as is but if that’s not enough, I’m happy to answer any questions in this thread or can offer paid support for more custom requirements.
Step 1. Add the Langchain Code Node
The Langchain Code Node is an advanced node designed to fill in for functionality n8n isn’t currently supporting right now. As such, it’s pretty raw, light on documentation and intended for the technically inclined - especially those who have used Langchain outside of n8n.
- In your workflow, open the nodes sidepanel.
- Select Advanced AI → Other AI Nodes → Miscellaneous → Langchain Code
- The Langchain Code Node should open in edit mode but if not, you can double click the node to bring up its editor.
- Under Inputs,
- Add an input with type “Main”, max connections set to “1” and required set to “true”
- Add an input with type “Embedding”, max connections set to “1” and required set to “true”
- Under Outputs, add an output with type “main”.
- Go back to the canvas.
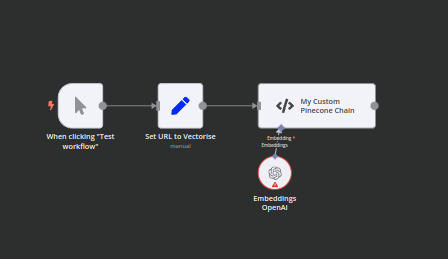
- On the Langchain code node you just created, add an Embedding Subnode. I’ve gone with OpenAI Embeddings but you can just any you like. We do this to save on writing extra code for this later.
Step 2. Writing the Langchain Code
Now the fun part! For this tutorial, we’ve set up a scenario where we want to vectorise a webpage to power our website search. The previous node supplies the webpage URL and our Langchain Code node will load and vectorise the webpage’s contents into our Pinecone Vectorstore. It’s a good use-case for using upserts because some webpages change often whilst others do not. We will be able to make frequent updates to this webpage’s vectors without duplicates or rebuilding the entire index. Sweet!
- Open the Langchain Code Node in edit mode again.
- Under Code → Add Code, select the Execute option.
- Tip: “Execute” for main node, “Supply Data” for subnodes.
- In the Javascript - Execute textarea, we’ll enter the following code.
- Be sure to change
<MY_API_KEY>,<MY_PINECONE_INDEX>and<MY_PINECONE_NAMESPACE>before running the code!
- Be sure to change
// 1. Get node inputs
const inputData = this.getInputData();
const embeddingsInput = await this.getInputConnectionData('ai_embedding', 0);

// 2. Setup Pinecone
const { PineconeStore } = require('@langchain/pinecone');
const { Pinecone } = require('@pinecone-database/pinecone');
const pinecone = new Pinecone({ apiKey: '<MY_API_KEY>' });
const pineconeIndex = pinecone.Index('<MY_PINECONE_INDEX>');
const pineconeNamespace = '<MY_PINECONE_NAMESPACE>';

const vectorStore = new PineconeStore(embeddingsInput, {
  namespace: pineconeNamespace || undefined,
  pineconeIndex,
});

// 3. load webpage url
const url = $json.url; // "https://docs.n8n.io/learning-path/"
const { CheerioWebBaseLoader } = require("langchain/document_loaders/web/cheerio");
const loader = new CheerioWebBaseLoader(url, { selector: '.md-content' });
const webpageContents = await loader.load();

// 4. initialise a text splitter (optional)
const { RecursiveCharacterTextSplitter } = require("langchain/text_splitter");
const splitter = new RecursiveCharacterTextSplitter({
  chunkSize: 1000,
  chunkOverlap: 0,
});

// 5. Create smaller docs to vectorise (optional)
// - Depends on your use-case: smaller docs are usually preferred for RAG applications.
const docs = [];
for (contents of webpageContents) {
  const { pageContent, metadata } = contents;
  const cleanContent = pageContent.replaceAll('  ', '').replaceAll('\n', ' ');
  const fragments = await splitter.createDocuments([cleanContent]);
  docs.push(...fragments.map((fragment, idx) => {
    fragment.metadata = { ...fragment.metadata, ...metadata };

    // 5.1 Our IDs look like this "https://docs.n8n.io/learning-path/|0", "https://docs.n8n.io/learning-path/|1"
    // but is only specific to this tutorial, use whatever suits you but make sure IDs are unique!
    fragment.id = `${metadata.source}|${idx}`;
    return fragment;
  }));
};

// 6. Define IDs to enable upserts.
// - You can now run this as many times without worrying about duplicates!
const ids = docs.map(doc => `${doc.id}`);
await vectorStore.addDocuments(docs, ids);

// 7. Return for further processing
return docs.map(doc => ({ json: doc }));
Step 3. We’re Done!
We’ve now successfully built our own custom Vectorstore node which supports upserts ![]() ! Pretty rad if you ask me. I think I’ll experiment a bit more with Langchain Code node and see what other fun things it’ll allow me to do… until next time!
! Pretty rad if you ask me. I think I’ll experiment a bit more with Langchain Code node and see what other fun things it’ll allow me to do… until next time!
- This code can be modified to work with other popular vectorstore such as PgVector, Redis, Qdrant, Chroma etc. Change the client library (and remember to add it to
NODE_FUNCTION_ALLOW_EXTERNAL) - Unfortunately, it doesn’t seem like you can access crendentials from inside the node so you’ll either have to hardcode your API keys/tokens as we’ve done here or pass them through via variables maybe?
- The document to vectorise doesn’t neccessarily need to be loaded in the Langchain Code. You can bring it in through previous nodes and use
this.getInputData()to access it.
Cheers,
Jim
Follow me on LinkedIn or Twitter.
Demo Template
thumbnail

